Black box classroom guide
Black box diagram
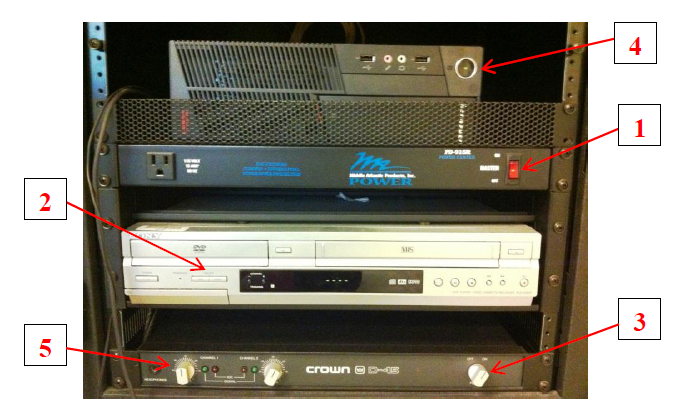
Below is a picture of a typical black box:

- Main power switch - lights-up when turned on
- DVD/VCR switch - Toggles between selecting DVD or videotape playback
- Sound amplifier switch - Turn right to power on
- Computer power switch - Blue light when turned on. The computer should automatically log in to Windows
- Volume control for left and right channels - Turn the knobs right to increase volume
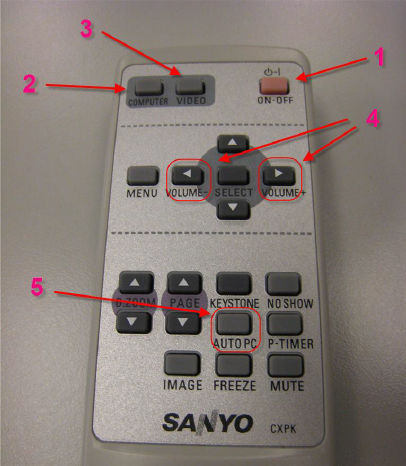
Remote for projector

- ON-OFF - Press once to turn on, press twice to turn off
- COMPUTER - Press for using black box computer (use Computer 2 input; may need to press button twice)
- VIDEO - Press for using DVD/VCR
- VOLUME
- AUTO PC - Press if screen is out of alignment
Using the black box
Make sure the equipment is powered on in this order:
- Main power switch
- Sound amplifier
- Projector - point remote control at projector and press ON-OFF twice
Pull down the projector screen mounted above the dry erase board.
Using the black box computer
Check if the computer's turned on; it's power button will light up blue.
Make sure the projector is set to Computer 2 input. If it's not, press the COMPUTER button on the remote to cycle between the Computer 1 and Computer 2 inputs.
Using the black box DVD/VCR
Check if the DVD/VCR player is turned on.
Choose DVD or VCR for the appropriate video source.
Insert your DVD or VHS cassette.
Press the VIDEO button on the projector remote
Using a laptop in a black box classroom
Depending on your laptop's ports, you will connect the VGA adapter or the Mini-Displayport adapter.
Troubleshooting sound problems
- Use the VOLUME buttons on the projector remote
- Adjust the left and right channels on the sound amplifier
- If you're using the podium computer, or your laptop, check the volume on those devices
Cleaning up
When you are finished with the classroom, please turn the projector off using its remote control. Do not turn off the computer. Do not turn off the black box's master power switch.